CrossFit Open 19.1 Breakdown and Tips
Tall people rejoice! A workout that is singularly designed for tall people (as opposed to just about every other workout where ‘excess’ height is more of a disadvantage)!
(I apologize for the low vid quality... If you want to see the videos in higher resolution and with better audio, make sure you follow Thrivestry on Facebook and check out the live videos!)
19.1 is an AMRAP for 15 minutes of 19 wall balls and 19 calorie row.
Overall
This workout, is not terribly long, but it sure is going to feel that way!
It should be no surprise that pacing is going to be key. Just like running a mile or a 5k, if you don’t have the right pace starting off, you will be punished toward the end and not get your best score.
Use the pacing chart to determine where you think you can realistically score. It is okay to go a bit faster on round one or two, but understand that if you finish the first two rounds at the 9-10 round finishing pace… you are definitely going too fast (unless you are Games material).
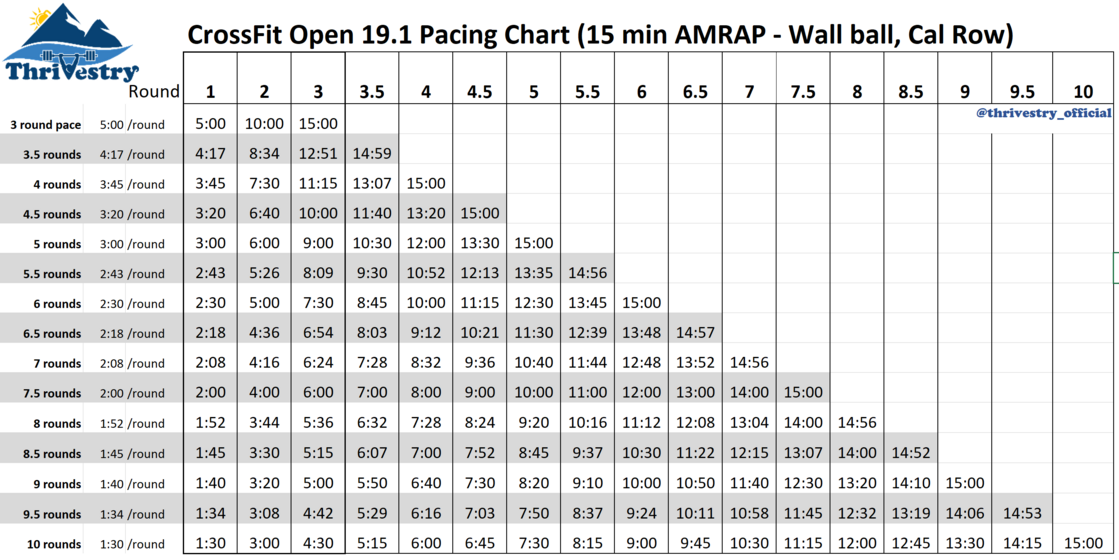
(For reference: Sam Briggs did this one -at 1am her time- and got 9 rounds. She was at 4:47 at the end of round 3, 9:52 at the end of round 6... just about PERFECT pacing. Experience means a lot!)
The goal is to start those first couple rounds at a pace that is 10-20 seconds faster than on the chart (no more), then settle into a pace you can maintain for the rest of the workout (staying just ahead of the pacing chart). You should be able to speed up a tiny bit on the end if you paced correctly.
It is important to note that the pacing chart splits into half rounds after round 3. This is for overall pacing.
MOST people will take more time on the row than the wall balls (probably about 50-100% more). For example, if the wall balls took you 45 seconds, the row will be around 1:30 (which would be a 6.5 round pace). Use the pacing chart to make sure you are hitting the checkpoints (as opposed to using it for each and every movement).
You should aim to finish the wall balls ahead of the scheduled time so you have more time for the row!
Warm Up
Prior to the workout, you’ll want to make sure you are thoroughly warmed up. Here is a good example:
Dynamic Warm up: 4 min easy row (first 2 min easy, then go faster on the last 2 minutes, focus on efficiency and form), then 3 sets of 10 jumping squats, 10 push ups, 10 ring rows, then 3 sets of 5 deadbugs per side, 5 inch worms, and a 10 second crab bridge
Mobility: Focus on the hips. Use mobs that help you get below parallel easily and will allow you to hinge on the rower without sacrificing your back.
Skill: None.
If you have a ‘heavy’ wall ball to use, go ahead and do a few small sets with it. This will help prime your body for the wall balls, and make the first couple rounds feel ‘light’. If you don’t have a heavy ball, do some sets of dumbbell thrusters. Shoot for reps of 5-10 for 3 sets.
The Pain Cave
While you should be smart about pacing for the first 10 minutes or so, there will be a point (or ‘points’) when you will want to stop because of the discomfort. Both wall balls and rowing are movements where you can actually keep moving more than you think. You will need to be prepared to suffer. You will be able to do more reps or calories than you think, especially toward the end of the workout!
Wall Balls
There shouldn’t be many surprises here!
One of the biggest takeaway’s folks should have is how they hold the ball, and the wrist flip at the top.
If you hold the ball on the sides, you are using energy to ‘squeeze’ the ball. This is inefficient. By holding the ball on the bottom, you will be able to create more of a ‘frame’ to support the ball (using your skeleton rather than your muscles).
By holding the ball on the bottom, the ball will also be closer to the target upon release. That means you’ll have to expend less energy to get it up over the line. That 5-7 inches will really make a difference over 80-120 reps!
Also, by holding the bottom of the ball, you’ll be able to utilize the ‘wrist flip’. By flicking the wrists at the top of the rep (like a basketball player shooting a free throw), you’ll be getting the benefit of mechanical advantage. It is like a trebuchet catapult or a bull whip breaking the sound barrier. That last little ‘flip’ can mean a lot less total energy expended to get the ball to the line.
Here is the part of the video where I talk about this technique:
For the vast majority of folks, breaking up the wall balls often will be a good idea.
By breaking up the wall balls, we’ll be able to let the ball fall and not expend energy catching it and doing the eccentric portion of the movement. It is easy to pick the ball right back up without much of a time penalty. Think about letting the ball drop 2-4 times per round, but DO NOT rest excessively between sets. Pick the ball up and get right back on it!
When it comes to picking the ball up, you do not have to stand up all the way before your first rep. You can squat down and curl it (or do a ‘half’ squat clean) to get it into position before initiating the rep. The rule book is explicit in stating that the rep starts with the hip crease below parallel (not locked out). If you are breaking these up often, this will save considerable time and energy.
With most movements, but it is important to avoid “NO REPS”. But in the case of wall balls, it is easy to keep doing reps even though you aren’t getting credit. If you get a no rep and you know what you did wrong (like the ball wasn’t high enough), fix it on the next rep.
If you try to fix it, and you get no repped again, you need to stop and ask your judge what they need to see. It is easy to do 3-4 reps that don’t count. When you do this, you are wasting time and energy. It is better to stop, get a short rest, and make sure you are moving effeciently!
Rowing
The calorie counter must be set to zero at the beginning of each row. You can do it, or your judge can. Talk to them beforehand if you want their help with this.
The damper should be a bit on the ‘high’ side. For shorter rows like this, a higher damper will pay off. “High” is relative term. Plan on setting it a few numbers higher than what you’d do on a 2k or 5k row.
Avoid ‘death gripping’ the rower handle! Have a looser grip to give the hands a bit of a break from all of the grip centric movements. Some people may benefit from putting the thumbs over the handle.
You should set the heels of the stirrups a little high, and then roll with fairly loose straps. If done correctly, you should be able to get in and out of the stirrups easily without having to mess with the straps. Your feet will be a bit less stable, but the strap will be closer to your shin and provide you with some safety. To get out of the straps, kick your feet up and lift your heels. The straps should be just loose enough to get the heel cups off of your shoes, so you can pull you feet right out.
Side note: some shoes (Like the Nike Metcons) have a lip on the back of the heel. These may get caught on the heel cup of the stirrup. You may want to use different shoes if you have a pair that your are comfortable training in.
The first few pulls each row interval should start with the quarter stroke>half stroke>full stroke technique. The goal here is to use the most powerful part of the stroke to get the flywheel up to speed faster. The part of the stroke to emphasize here is the middle where the legs have the greatest mechanical advantage.
Watch out for early arm pulling! If you start bending your arms too soon, you will blow up your biceps even more (not to mention your grip). Keep those arms straight until the legs and hips have finished their job.
The tendency for most people will be to use the row to do some slower pacing. But when rowing for calories, the slower you row, the farther you go! What I mean is that if you row the same number of calories in 2 minutes versus 1 minute, the 2 minute attempt will have to go more meters! Instead of ‘cruising’ the row and using it as a pacing tool for the wall balls, I think it is best to put a bit more effort into going a little faster. You do less total work, and then you can rest a bit more on the wall balls.
That doesn’t mean that every row should be a sprint! The goal is to be able to get off the rower and go right into your first set of wall balls. No, water, or anything. After you bang out your first set of wall balls, then take a break (if you need it).
If you are someone who’s quads/legs blow up on wall balls, you may want to finish each row with some hip hinge and arm only pulls for the last calorie or two. This will allow your legs a bit of recovery (since you’ll want to let the rower ‘coast’ into the 19th calorie before getting off anyway).
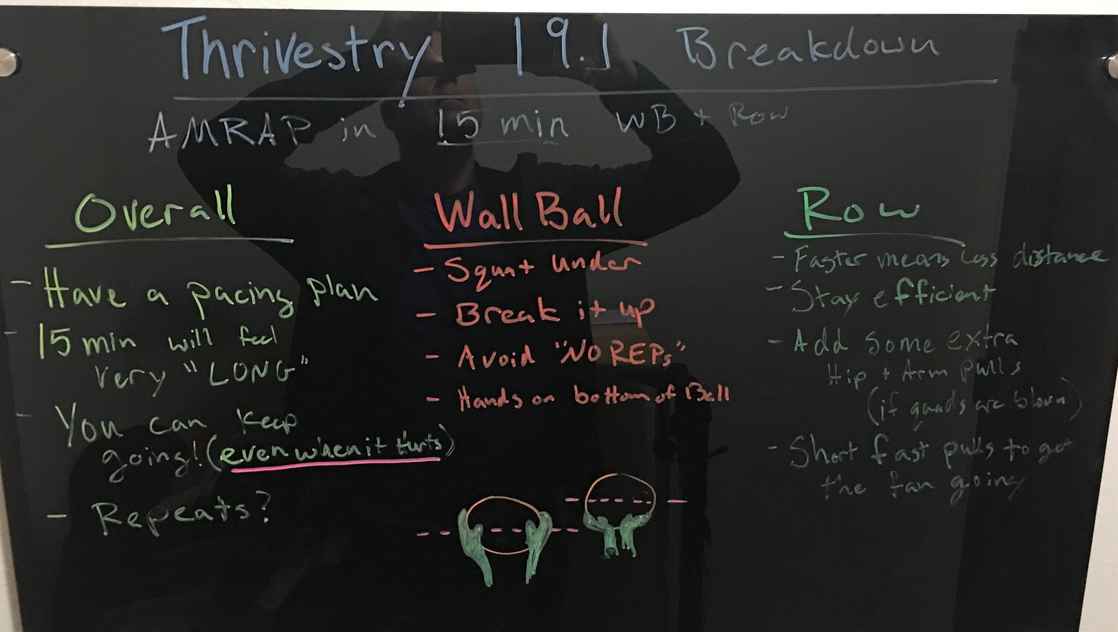
Blackboard Close Up
Transitions
It is going to be ‘easy’ to lose time on the transitions. If you go too hard on the wall balls or the row, you will take too much time to get started on the next movement.
The same thing goes for if you plan on doing a ‘big’ set of wall balls. You will stop to mentally prepare before you begin. It is much better to just get a small set of wall balls in (with no rest), then to break up the wall balls, than to take an extended break so you can do a big set.
Repeats?
Generally, I am not a fan of repeats. If someone must do their absolute best to make the age qualifier, and they royally screwed up the first time, they may want to do this one a second time. That said, with good pacing and strategy, a second time through shouldn’t improve one’s score much. Not a good idea with 4 more workouts coming down the pipe!
If you are the person who always does better on the second try (or third), you need to figure out what you are doing wrong. There are no repeats in local competitions, the Sactionals, the Games… You need to nurture the ability to smack it out of the park the first time, every time!
THAT SAID, if you used the chart and picked a pace that you couldn’t maintain (or you felt ‘too good’ at minute 10), you might consider doing a repeat. This workout shouldn’t cause too much soreness (it won’t shred your hands, etc.).
For example, if you picked 6 rounds and stayed at that pace strictly (+/- 10 seconds each round), and you blew up at 10 minutes… you probably didn’t pace correctly. You MIGHT want to consider doing it a second time.
Mindset
Create a plan that you can control (when you will break things up, when to speed up, when to slow down, how to breathe, etc.). When you feel the butterflies in your stomach before the workout starts, take some deep slow breaths and remind yourself that what you are feeling is ‘paleo performance enhancers’ (adrenaline and the like). Don’t let it all slam into your system before the workout even starts, but understand that it is a good sign, and that you can harness it to help you have a great performance!
And another reminder… This is going to hurt! But it should only get seriously uncomfortable at the 8-10 minute mark (or a bit later). If you are starting to blow up before that, you went too fast. Toward the end of the workout, grind out that extra couple reps of wall ball or last few pulls on the rower. Your body will be telling you to slow down, but you will have more reps in you!
Shoes and Belt
Go ahead and wear Olympic Lifting Shoes if you feel like they help you squat (and that extra ½ inch of height matters). Skip the belt though!
Next Workouts
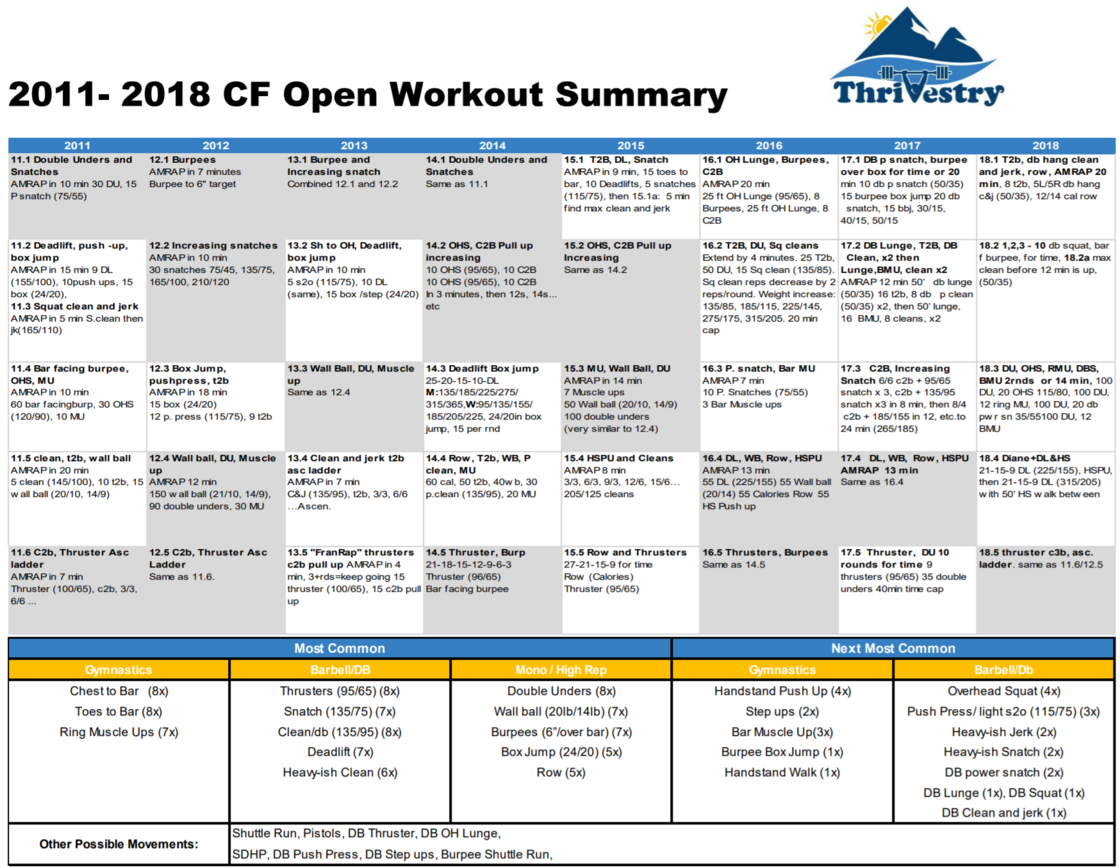
We can only eliminate 2 movements from the ones that are likely to show up in the Open. You now have another week (or more) to work on those critical movements. Double unders, pull ups, toes to bar, muscle ups, snatches, thrusters, burpees… As soon as you recover from this week, put in the work to set you up for success in the later weeks!
Here is a list of all of the Open workouts through 2018 (so you can see what you might need to be working on)
Have fun!
-jj
0 comments
Leave a comment