CrossFit Open 20.3 Breakdown and Tips
REPEAT ALERT!
Scroll down to see the deep dive into everything from pacing according to your abilities, what gear you should wear, movement points (including hand release push ups and bear crawls), etc.
This 'update' is just to cover some stuff that you may have missed (basically a TL;DR version)
Main Points
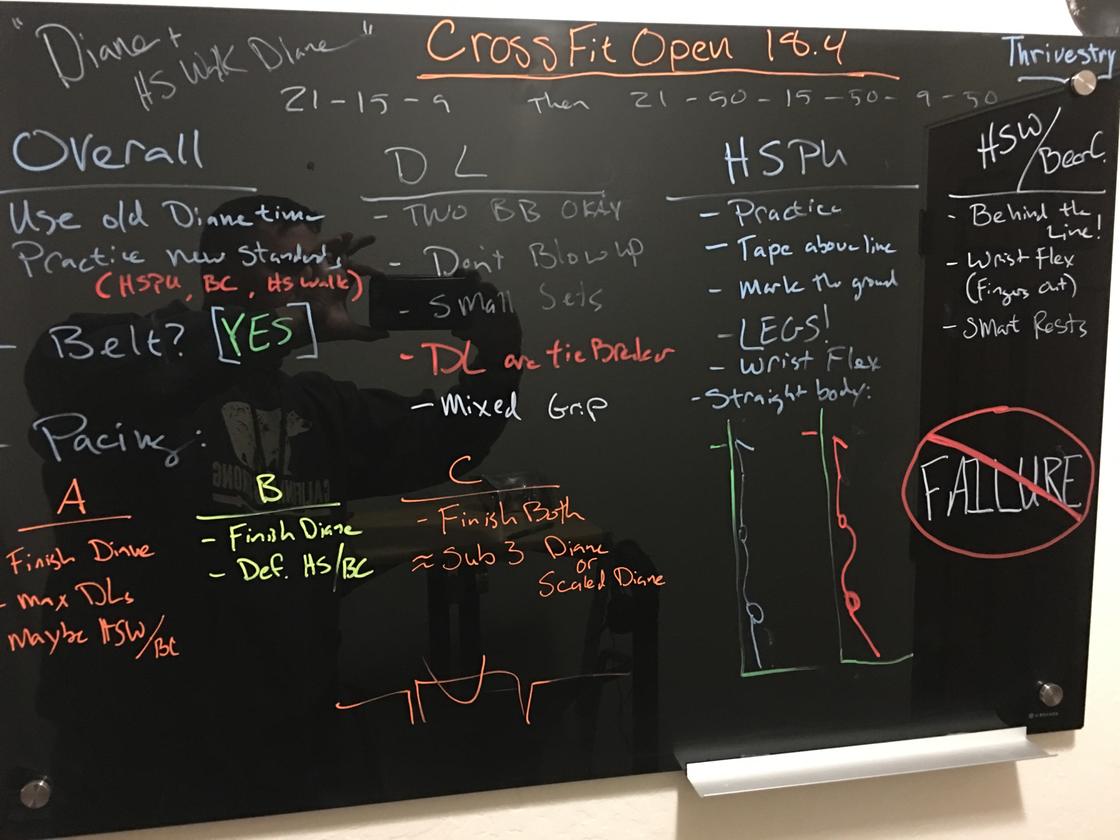
The workout is - 21-15-9 Deadlifts (155 / 225) and Handstand Push Ups then 21-15-9 Deadlifts (205 / 315) with a 50' HS Walk or Bear Crawl in between
Deadlifts
Exact point in the video: https://youtu.be/ginqwWH1EHA?t=69
- Keep the bar close to the shins to save your back
- Save your grip, it will make the HSPU easier
- Wearing a belt is a good idea
Handstand Push Ups
Exact point in the video: https://youtu.be/ginqwWH1EHA?t=211
- A belt can help you with HSPU
- Practice the standard!
- Hands more narrow, mark the floor so you can be consistent
- Kipping HSPU are all about the 'kick' of the legs
- The FOOT ANGLE is critical to getting the heels above the line. Remember to pull the toes toward the knees!
Handstand Walks
Exact point in the video: https://youtu.be/ginqwWH1EHA?t=445
- Spend some time on wrist mobility between now and when you do the workout! That extra mobility will help significantly with HSPU and HS walks
- Fall forward. Even if you take a few fast 'steps', you can get quite a bit of reps in 5' increments
- Be careful of the line. No reps will cost you a lot if you start with a finger touching the line!
Subscribe to our YouTube and Facebook feeds to get the updates as soon as they come out each week of the Open!
Good luck and have fun!
-jj
Full Write Up from 2018!
Bringing back a classic! If you weren’t aware, “Diane” has shown up in competition at the Regional and Games level many times. We have also seen heavy-ish deadlifts with HSPU two times in the Open before! 21-15-9 Deadlifts and Kipping Handstand Push ups doesn’t seem that taxing (you can either do them or you can), but it can be VERY taxing if you are halfway decent with these and you finish in under 6 minutes.
The more interesting thing is that they have added handstand walks and bear crawls into the Open! I think it is well executed. People aren’t required to do handstand walks until they have demonstrated that they can do all of Diane, then 21 more deadlifts at a heavy-ish weight (315 and 205). If you are at that level, and have been avoiding your handstand walk practice, you will be exposed.
I’ll be going over some general strategy tips, as well as some special details for those getting to the handstands and those people scaling and doing bear crawls. If you have been following Thrivestry, you will be very familiar with both bear crawls and handstand walks (as a scale up). We did two bear crawl/handstand walk workouts in the last 20 days and that doesn’t even include when we do it in the warm ups!
We are also finishing a deficit deadlift cycle, which is just about perfect! That said, we were working more on top end strength and not volume. There is a big thing to remember here: your top end strength does not always carry over to higher volume sets at much lower percents. Even if your deadlifts are feeling a lot stronger after the cycle, you’ll want to be careful with doing large sets. More about this in the deadlift section below!
Overall
Look up your old Diane time! This is one of the reasons I am a fan of keeping track of your numbers, but is also why I am always telling people to take notes. It helps to put the performance in context. If you did Diane last after doing some heavy deadlifts, you should be able to go a bit faster if you are ‘fresh’. Your notes also might mention that your shoulders were a bit tired from something else and that affected your handstand push ups. These details will help you pace this attempt much better.
If you haven’t done Diane in a while, or ever, you’ll want to be extra careful on pacing. The combination of a grip taxing movement like deadlifts, the new handstand push up standard, and the higher volume of reps, is a recipe for people hitting a wall. Have a plan for linking the deadlifts and HSPU on the first round, but it should be very ‘conservative’. Small sets and small rest! Having a bit more ‘juice’ for later rounds will pay off. Getting no repped, or stuck, on the 15s or 9s will hurt your score significantly!
Practice the new standards!
For the HSPU, do the measurements and compare it to the measurement method from last year. Is it the same? Depending on the length of your arms, it could be different. Make sure you know where to place your hands and how to flex your ankles to make sure every rep counts.
Even though you may think you do bear crawls correctly, check the standards to make sure you are doing them according to what the judges are looking for. The same thing goes for handstand walks. One BIG thing to notice is how your hands must start behind the line. Not on the line. BEHIND THE LINE. Not even a finger can touch the line on the ground otherwise it will not count. It will help if the judge reminds you and points to where you should start your hands (a few inches from the line).
Belt?
Most people will benefit from wearing a belt the entire time (maybe taking it off for the BC/HSW). Obviously this will help with the deadlifts, but it also helps with people’s handstand push ups! By wearing a belt for HSPU, many people are able to keep a tighter core. This will keep the back flat (as opposed to hyper extended), and make you ‘taller’. It also has the benefit of helping you keep braced through the abdomen. Bracing through the abdomen will help you ‘press’ out those handstand push ups (and why bracing is so important during bench presses).
Shoes?
Do not wear your Olympic Weightlifting shoes here! You want your heels as close as possible to the ground. Wear flat shoes with a minimal sole. Oly shoes have an elevated heel which will force you to pull the bar from a slight deficit.
Pacing
Group A (Finish Diane and get some deadlifts in)
A large portion of folks (Rx or scaled) will just be looking to finish the Diane portion and getting the most deadlifts possible at the heavier weight. People finishing Diane around 6-8 minutes will fall into this category.
You will want to pace that first round of DL and HSPU/PU accordingly. The first round of 21/21 is almost half of the reps of the entire workout! If you finish it in 1-2 minutes, you probably went too fast (unless you plan on finishing the whole first part in 3-4 min). Use small fast sets here and avoid resting too long between sets.
Push the pace on the last set of DL to get a good tie breaker, but then don’t rush the HSPU/PU too much. You don’t want to risk some no reps, and the extra time here will pay off for your first heavy deadlift reps.
If you have the time with the heavier bar, make sure you get ‘organized’ and know that the bar is going to feel extremely ‘heavy’. You will be gassed from the Diane, and that will affect how heavy the bar feels. Do not get discouraged. If you have more than a minute or two, you should be able to increase the pace of the heavy deadlifts after you recover a bit. Make sure you loosen your belt between attempts and do some deep breathing to help you recover from the metcon portion.
If you do finish the 21 deadlifts, take a moment to get prepared to go into the HS walk/Bear Crawl. The new standard means that you’ll have to back up behind the line if you don’t make it to the 25’ turn around point. The more you break it up, the farther you will have to go! Try to get it done in as big of chunks as possible.
Group B (Definitely finish Diane, and get some more rounds in)
The next group of people will be those who finish Diane in 4-6 minutes. Assuming the next weight isn’t too heavy, you should be able to rep out some sets of deadlifts (again: small fast sets). Remember that your tie breaker time is the time you finish the deadlifts. As you get to your last set of deadlifts, finish strong before taking a moment before the handstand walk/bear crawl. The walk/crawl will be your time to recover before the next set of deadlifts!
When you finish your walk/crawl, go right back to the bar and get that first set started! Avoid the temptation to dilly dally around with chalk and belts. Your posterior chain has rested enough. After you bang out a set of 1-3 reps, then take a bit more time if needed.
Group C (Finishing Both)
A very small percent of people will finish both. If you can’t finish Diane in under 3-4 minutes, you probably won’t finish the workout. The caveat is that if you struggle with HSPU/PU but your deadlift is very strong. People in this group could still finish both sections assuming the second barbell weight isn’t going to be an issue.
I want to point out that your best Diane at 3-4 minutes isn’t a sure sign you will finish (even if your HS Walks are on point). You should be pacing the Diane to be about 80-90% of max speed so you have enough gas to get through the rest of the workout. It will be detrimental to your overall score if you crush yourself on Diane, but you can’t recover to complete the second part! Diane is only half of the total deadlifts, and the first deadlifts are significantly lighter!
Deadlifts
Keep in mind that it is okay to have two barbells set up, or a ‘super friend’ help load the second bar for you. If you have any chance of making to the second bar, don’t get surprised and not have another option ready (costing you valuable time).
DON’T BLOW UP. You may have noticed a theme here, but I’ll say it again: be conservative on your reps for the first round of DLs! Adrenaline will be high, and if you did our last strength focus, the bar will feel really light. Stick to your plan of doing small sets (3-5 reps) and use the clock to pace yourself. If you end up ‘over pacing’ a bit here, you will make it up on later rounds of deadlifts. But if you go too big or too fast here, it will be very bad for your score.
I know many people won’t believe me, but you can watch Scott Panchik’s performance as confirmation. He was breaking the first set (and every set) of deadlifts up into small sets from the beginning. Even with his opponent doing faster HSPU, he was only 10 seconds slower on the Diane portion, and a minute faster overall!
Deadlifts are the tie breaker
When you are getting to the end of a set of deadlifts, and you are more than halfway done with the time, try to push the pace to finish strong. You will get a faster time on the tie breaker and that will help you overall rankings.
Don’t forget about the mixed grip and the hook grip! The more we can save your grip, the easier HSPU/PU will be. This is because as your grip gets taxed, it will make those pressing movements much harder due to the wrist flexion. For those doing HS Walks, it will be even more prevalent.
As a reminder for sets of deadlifts, keep the bar close to the shins. It is common for people to let the bar get out over the mid foot (or even toes) when repping out deadlifts. Every millimeter that bar moves away from the shins and legs, the heavier it will feel on your back. Drag that bad boy up your shins!
Handstand Push Ups
Practice the new standard! Don’t be the person that is getting no repped and not knowing why. Mess around with hand positioning so that you have the width that will get your heels over the line, but isn’t too narrow that it make the HSPU harder.
Mark the ground/mat so you know where to put your hands. Most people will start to go too wide, or place their hands farther from the wall as they get tired. This will make your feet no longer go above the line no matter how far you ‘reach’. Consistency will pay off here!
If you have access to mats that are big enough for your hands and your head, use them! Doing the bumper-plates-with-an-abmat-thing is okay, but your head will ‘crush’ the mat so that you are actually doing them from a slight deficit. I’ve found that the best set up is to use a softer mat below, then something a bit more rigid on top. The softer mat below will absorb some impact of your head, but the more firm mats on top will make it easier on your hands.
Side Note: Be careful with using the ‘puzzle’ mats that fit together like a puzzle. They have the tendency to separate at the worst times. I know of a couple athletes that have gotten injured because the mats came apart mid rep!
When doing kipping HSPU, the most important thing is using your LEGS. Some people will be able to get away with short choppy kicks on HSPU workouts, but I do not recommend it. Bring the knees down close to the hips (even your chest) to get the maximum amount of leg drive. These tend to be a bit longer on the cycle time, but it will guarantee good reps as you get to the end of the 15s and the 9s.
One of the biggest things to remember with kipping HSPU is that your legs need to hit full lockout before you start pressing with the arms. The best analogy is thrusters. Like thrusters, you do not want to start pushing with the arms until the legs have fully extended. The legs should be ‘yanking’ the rest of the body up.
The feet should kick up and then back. Do not try and kick back toward the wall or you will hit too soon and it will kill your momentum.
Practice pulling your toes to your knees at the top of each rep! If your toes are pointed forward, or two the ceiling, your heel will be 2-3 inches under the line. Tell yourself to flex your quads (straightening the knees), and ‘lift’ your toes like you are smashing your heels up to the sky.
Take some time to mobilize your wrists for this one. Because of the way the body works, having your wrist bent back to the max makes the finish of the HSPU much harder. You can feel this right now by taking your fist and punching it up to the ceiling, then maximally flexing your wrist, and then trying to do the same movement. You will find that it is harder to get to full extension with the wrist bent back. Do some myofascial release on your forearm and spend some time stretching out your wrist before the workout (and not just focusing on the shoulders).
If you do struggle with wrist mobility, you can try to point your fingers more to the outside (with the web of the thumb facing the wall). This isn’t an ideal position for pressing with the shoulders, and you have less balance, but it can be a ‘work around’ if wrist mobility is a significant issue for you.
One reason people struggle with the height requirement is because as they fatigue, they start to break posture through the whole body. You’ll see this with people placing their hands too far from the wall, then resting their shoulders or butt against the wall and hyper extending the back. This ‘broken’ posture will turn what should be a good rep into a ‘no rep’.
At the top, keep the body straight from wrist, to shoulder, to hip, to foot. Push the head forward to drive the feet back to the wall (and not do an ‘air miss’ where you do not contact the wall).
This is where a belt can actually help with HSPU. It will help you keep your back flat as well as help you brace through the core. Bracing through the core will allow you to get more pressing power out of your shoulders.
AVOID GOING TO FAILURE
HSPU have a way of sneaking up on people. If you have to grind out a rep, or you get no repped and you aren’t sure why, come off of the wall and take a break. The goal is to pace these so that every rep is ‘clean’, and only your last rep of 9s is a grind (because you paced correctly).
Handstand Walks
Remember that you must start with your hands behind the line! Don’t get too close and accidentally touch the line with your fingers. This is a new standard, so make sure you practice it, and have your judge (or coach) point to where you should put your hands in the moment.
Wrist flexibility is also a key player here. If you can keep your fingers pointed the direction of travel, you will have better balance and an easier time going for big distances.
If you can’t get into that position, you will have to turn your fingers out. This may get you into position, but your balance will be compromised and it will be harder to go more than 5 or 10 feet at a time. Do not get discouraged, and chip away at each section with minimal rest.
Keep in mind that with the new standard, the more ‘breaks’ you take, the farther you will have to go (because you’ll have to cross the line, then start behind it each time). If you can do 10-15 feet or more in a stretch, a bit of extra rest will pay off. And depending on how much time you have, you may need the extra rest before the next set of deadlifts anyway!
Hand Release Push Ups
One of the keys here is that you can’t worm off the ground. It is common for hand release push ups to turn into ‘rocking chair’ push ups when fatigued. The body must stay in a straight line when leaving the ground.
Resist the temptation to ‘go soft’ at the bottom of the push up when lifting the hands off of the ground. If you lose tension, it will be harder to get moving as one piece. Hold full body tension through the entire movement and drop to a knee from the top when you need to rest!
You may also want to alter your hand position on the push ups. Because of the hand lifting part, it may be difficult to get the hands off of the deck with you usual push up position.
It should also be noted that because you are lifting your hands, you will lose the stretch reflex from the muscles in the arms. When they come back down onto the floor, you should almost ‘punch’ the floor to generate more tension and moment to get yourself moving.
Bear Crawls
While we do bear crawls regularly, it will be a good idea to practice these with someone watching to make sure that you are doing them to the Open standard. The hips must stay above the head, and the palm must be on the floor.
If wrist mobility is an issue, turn the fingers out so that the web of your thumb is going forward (the direction of travel).
Repeat Attempts
If you are someone in Group A or Group B, a second attempt won’t be that detrimental to your training. You’ll be doing roughly 45 moderate load deadlifts, and then some heavier reps. If you really messed up your pacing, it could pay off leaderboard wise.
That said, bouncing on your neck like a pogo stick while also doing high volume deadlifts multiple times in a few days is dangerous.
If you get well into the second part, another attempt will likely negatively affect your training. If the deadlifts really aren’t the issue (and handstand walks are), you might consider a second attempt, but it isn’t recommended unless you really need a higher score to get to the next level of competition.
Mindset
Set a conservative plan and then stick to it. Once you get through the sticking point (usually on the 15 handstand push ups), you’ll have the option to speed up if you are feeling good.
Diane has a reputation of lulling you into a false sense of confidence on the first round, then kicking you in the teeth out of nowhere.
If you do find yourself getting stuck, STOP, watch the clock, and rest more than you think you need to. Talk to your judge if you are getting no repped, and make sure you know what is going on.
You will also want to keep the bigger picture in mind. We have one more week of the Open, and a lifetime of training ahead. Do not let your ego take you to a place where you sacrifice your safety to get a ‘good’ score. If you can’t qualify this year (or beat your buddy) with perfect or near perfect form, it just means you need to get better so you can do it while looking good (and staying safe) next year!
Note to Owners on Tape
I am a fan of using the extra wide ‘painters tape’ (link here)The green stuff is usually better than the blue. The best way to place it is so that the BOTTOM of the tape is the boundary. This is because if people are doing HSPU correctly, their feet are hitting the wall above the line, then dragging down.
If you use the wider tape, they will be hitting inside of the tape and then dragging down to the bare wall. When the tape is placed below the boundary, it ends up rolling the tape down! The Judge can fix the tape for the person, but it is best if we don’t have to mess with it at all!
Thrive on.
-jj
0 comments
Leave a comment