CrossFit Open 21.2 Breakdown, Tips, and Pacing Guide (17.1 Updated)

21.2 is a repeat of 17.1!
I've made a few updates to the original recommendations based upon what we saw in 2017. For the most part, the information holds up really well! (My video skills not so much. Haha).
Use the PDF pace charts to help you get your best score. Open 17.1 pacing chart A - Super Humans.pdf
Open 17.1 pacing chart B - Mortal Humans.pdf (if you know you won't make it until the end).
Open 17.1 pacing chart C - Complete Chart.pdf (hard to read, but it has it all)!
Enjoy! -jj
Video Overview: https://youtu.be/DW2S3LYt10Y
Pacing
Pacing will be key on a workout like this. We have come up with a pacing chart that should help you start at a pace that will allow you to finish strong.
Open 17.1 pacing chart A - Super Humans.pdf is for the badasses, Open 17.1 pacing chart B - Mortal Humans.pdf is for the 'mortals', and Open 17.1 pacing chart C - Complete Chart.pdf is combined with all of the data as well as extra rows for each 10 dumbbell snatches (on every round and not just the last). I have attached PDF versions as well as jpeg versions for easy printing and online sharing respectively.

The first row is the desired time you plan on finishing the workout. If you are unsure what sort of pace you will be able to maintain, do two rounds of 10/10 and use the numbers below the desired finish time. The DB pace is a bit ‘fast’, so plan on counting the transitions during the burpee times. If you look at the 10 rep time for your chosen pace, you should be able to add the snatch and burpee times together and double it. Using this 40 rep ‘test’, you should get an idea of where you should be starting at.
That said, you may want to ‘round down’ in regards to pacing. Being a bit conservative early on will make it easier to speed up if you are feeling good. If you come out ‘hot’, you are guaranteed to pay the price on the later rounds (especially with the increasing reps of db snatches).
You should aim to stay a bit ahead of the pace through round 3 (by a small margin). If you start to fatigue and you can’t keep you pace, drop down to the next column and try to stick with that.
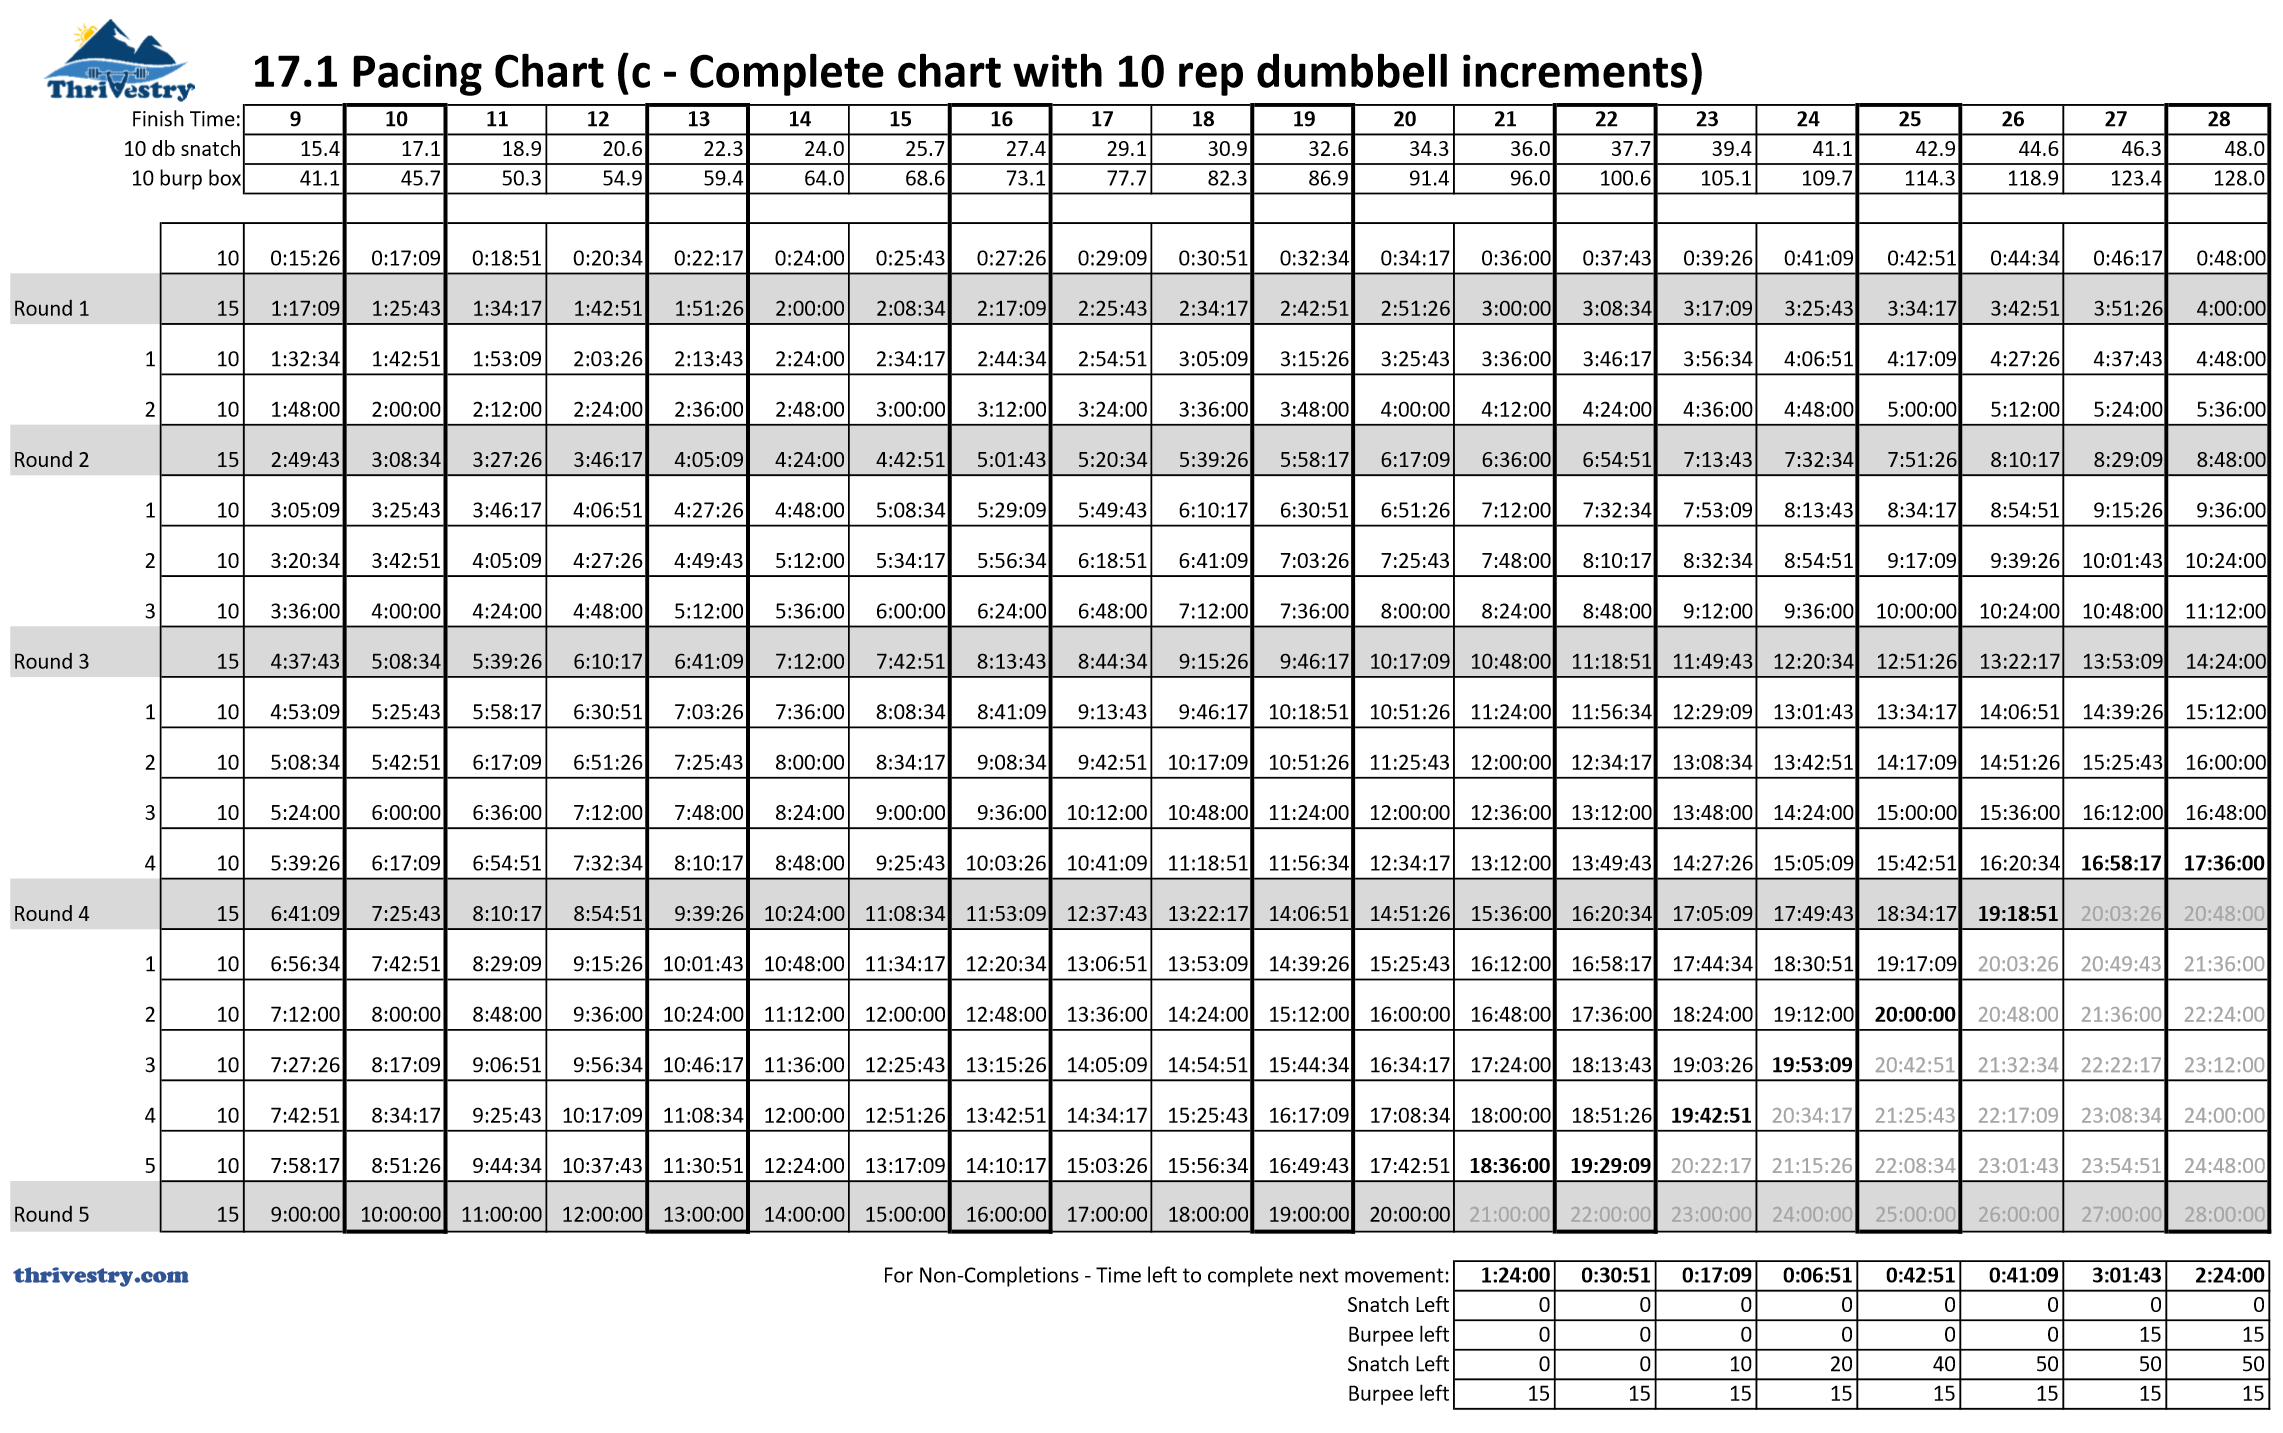
The numbers on the bottom right of the B and C charts are for people who aren't going to finish in the time cap. What this represents is how much time after the last movement to get some more reps in before the time runs out. For example, if you are able to maintain a 26 minute pace, you will finish the round 4 burpees at 19:18. This will give you approximately 41-42 seconds to complete as many of the remaining 50 snatches and 15 burpee box jumps over as possible.
Grip blowing up and pacing
If your grip tends to blow up (and especially if it blows up on db snatches), plan on doing smaller sets here with a bit more rest. Make up some time on the burpees since you will be less fatigued (winded).
Not finishing?
If you are pretty sure you aren’t going to finish, speed up a bit on your last round of burpee box jumps for the tie breaker, but do not ‘wreck’ yourself. Going super hard on this last round of burpee box jumps will backfire if you get one less dumbbell snatch rep! Speed up a bit, but make sure you are able to maximize the number snatches you get before the time runs out. As a guide, if you are getting really close to the time limit and you will only squeak out 10 or so snatches, go pretty hard. If you know you are going to finish the burpees with 2+ minutes for snatches, don’t go as hard and try to get as many snatches as possible.
Snatches
Set up
Set the dumbbell next to the box off to the side so that you don’t have to walk as far to pick it up. This could make up some significant time since you will always finish on the far side of the box (if you don’t get no-repped).
Use the hook grip if you can!
If you have access to the straight handled dumbbells (versus the fat curvy ones), you may want to experiment with using these. Grip will likely be a factor for many people on this one. If you do use the curvy handles, try and grab your thumb and forefinger near where the handle is more narrow (see video for description). This thinner area should help you save your grip.
Wide feet?
I haven’t gotten confirmation on this (so if CrossFit doesn’t allow wide feet on the pull, don’t blame me), but some people may benefit from having a very wide stance on the pull. This will shorten the distance to get the db to the floor. If you have long levers and/or you tend to have your back blow up from hinging at the waist, this may help you. THAT SAID, you will need to finish with the feet underneath the body. I did not see anything on the CrossFit site about the finishing position of the feet with a dumbbell snatch, but every other finishing overhead position requires the feet to be underneath the body. SO, if you do pull with wide feet, take the extra step to bring your feet underneath you for the rep to count.
BIG Pull!
Lots of hip drive and a big pull means that you won’t have to press it out with the arm. Pressing it out will make the later rounds harder as well as compound the difficulty of the burpee. If you can’t muscle snatch it, be prepared to catch the dumbbell with a partial squat (i.e. ‘power’ snatch).
Don’t ‘work’ on the way down!
If you take forever to put the dumbbell down (especially below the waist), you will be wasting energy and time. Let gravity do its job and put it down quickly. Dropping the dumbbell probably isn't the right approach as well. It will likely bounce around and slow you down (not to mention make you gym owner hate you).
Switching hands on the way down?
You'll probably want to switch hands as the db passes by your face if you are comfortable with the load (without stopping). If it is a bit heavy for you, you may want to bring it down to your shoulder under some control then switching, before hitting the floor with a touch and go rep.
If it is significantly heavy for you, do singles and don't worry about switching hands.
Burpee Box Jumps
15” box top minimum
If you have a box that is only 15” – 20” per side, use it! Across 75 reps, an extra 5 inches will mean 375 inches of extra distance traveled. That said, if you have a box and you aren’t sure of the dimensions of the top, measure it so that you know it is legit!
Secure the box if it is ‘wobbly’
Some of the foam boxes people use can be kind of unstable when doing up and over box jumps. Use something like stacked bumper plates or other boxes wedged up against the sides to prevent a box from ‘rolling’ as you jump up and over.
Drop down fast
First, start with the burpee (not the box jump)! When dropping to the floor, drop down fast. Do not move slow here even if you are pacing the burpees out. The longer you take to get down to the bottom, the more energy you are using. Drop down and let your body hit the ground with some decent force!
Step up out of the burpee?
Most people will do best with stepping up, one leg at a time, to the box before jumping over. If you are a burpee ‘ninja’ you may try jumping both feet up to the edge of the box, but with the total volume of reps, and the duration of the workout, this will be a strategy for a limited few. Just make sure you jump up onto the box with both feet if you plan on doing this one ‘as prescribed’!
Do not open your hips all the way on top of the box
On ‘regular’ box jumps, we need to see hips open. For this standard, we do not! If you are comfortable landing in a deep squat on top of the box and then jumping/stepping down, do it! Taller athletes, or people who aren’t as flexible, will need to land with more open legs. That said, you still do not need to open up the hips all the way. Some people may start their turn around during the jump. I.e. both feet jump, land 90 degrees from where you started, then land another 90 degrees so you are facing the box. I haven’t seen any rules against this, but you are still using this variation at your own risk!
Stepping down off the box and turning
If you are doing a ‘step down’, I recommend starting to turn at least 90 degrees so that you have less total motion. If you step down, then turn, you’ll be doing extra ‘stuff’ and that will eat up your time and energy!
Repeat attempts? (and more)
If you are really keen on getting a great score, you may need to try this one twice. I do not recommend more than that due to the volume. Part of the reason I recommend this one more than once is that week 1 always has a lot more people enter so every second/rep has a much larger ‘weight’ than in later weeks. This is especially true for Masters.
But keep in mind that if you do this one more than twice, you are running the risk of injury and/or you are putting your training on hold for the rest of the Open. We know that we aren’t likely to see these movements again (it isn’t impossible, but hopefully there isn’t too much overlap), so that means we can continue to focus on other movements that ARE likely (muscle ups, chest to bar, toes to bar, double unders, wall ball, etc.). Hammering yourself for a second or third attempt on the “hope” to get an extra couple reps isn’t a good gamble!
Good luck and have fun! And keep in mind, that no matter how you end up ranking, you will be a more experienced athlete. Treat this experience as a test and as a learning opportunity!
-jj
Thanks again for those of you who are already part of the team. If you haven’t gotten on board yet, what are you waiting for? Email me to set up a phone call or sign up today!
0 comments
Leave a comment